Monday, March 31, 2008

Tagged: Five Must Have Morning Items

No school today since it's Cesar Chavez Day (ain't it weird? We get this day off, but not Presidents or Veterans Day), so I'm here at work earlier than usual. These past few days have been so uninspiring for me to do my makeup. I haven't had any good combinations running in my head, or anything post worthy as an FOTD. So most of the time I just run out of the with just mascara on or maybe blush if I'm feeling eager. I don't know, sometimes I have one of those days where I don't want to touch my makeup stash because I have so much to play with it gets confusing!

Regardless of those lazy days, these are my five must have morning items. No matter how much in a hurry I am, these are the products I can't leave my house without.

1. Philosophy Purity Cleanser
To wash off the Ly-na cream from last night.

2. Philosophy Hope in a Jar Moisturizer
I know a lot of people may not be too fond of this moisturizer, but it has worked out for me. It works because the cream is not too thick for my combo skin, and it really moisturizes my face especially this winter season.

3. Shiseido Ultimate Sun Protection Lotion for Face and Body SPF 55
EVERYONE should be wearing sunscreen on their faces. I haven't really got into this habit until I started reading beauty blogs and how important it is to have protection on your face. Every since then, I never walked out of my house without this slapped on my face. I like this particular brand because it didn't break me out, dries fairly quick, and dries into a matte finish.

4. Degree Ultra Clear Little Black Dress Approved Deodorant
Self explanatory. Stinky pits are just not attractive.

5. Lotion
I'm still in the verge of finding my holy grail lotion since my hands have turned to be uberly dry this winter season. So for now, I just use whatever is in the bathroom, as long as I have something on. I just can't stand the feeling of ashyness in my skin.

*Tagged by Christy.

Five beauty bloggers I'm tagging:


Regardless if you were tagged or not, what are your five must have morning items?
Share:

Friday, March 28, 2008

Queen Helene Mint Julep Masque (Review)

What it claims it does: Deep cleans and gently exfoliates the dull surface layers of your skin.

Helps dry up acne pimples
Rinses away blackheads
Helps shrink large pores

The original natural home treatment, developed by a dermatologist, that will actually dry up acne pimples, rinse away blackheads and even help shrink enlarged pores.

Simply apply Mint Julep Masque to your face and neck. Within minutes it firms and hardens, as its suction action draws out waste matter from the pores. Minutes later, rinse the masque away with warm water and a washcloth. After the masque is removed your skin will feel clean...refreshed and smooth.

Even for people who are fortunately free of skin problems, Mint Julep Masque is a refreshing facial treatment that relaxes tired muscles and eases tension lines on the face and neck.

Ingredients: Distilled Water, Kaolin, Bentonite, Glycerin, Zinc Oxide, Propylene Glycol, Sulfur, Chromium Oxide Greens, Fragrance, Methylparaben

*Source (drugstore.com)


Queen Helene Mint Julep Masque Report Card:
Quality: 4 out 5
Price: 5 out of 5
Packaging: 3 out 5

Overall: 4 out of 5


What I like about the product: It's a great mask for a cheap price. For less than $4, you're doing your face a big favor (mainly if your oily/combination/acne-prone). Your face really feels refreshed and clean afterwards. It really dries up my pimple like what it claim it does. See, I get these monsterous pimples once in a while. They're red and angry, but after using this, my pimples have been reduced in size. Please don't expect a miracle that it'll completely vanish it, but by using this, I found that it reduces my chances of getting acne scars where the blemish is and redness. Also, you will definitely feel your pores tightening after slapping this on. I only use this once or twice a week, depending on how my skin feels. If I know there's a pimple waiting to happen, I slather this thing on my face and I know it'll work its magic. The blackheads in my nose are also gone thanks to this product. It's very easy to use. Put it on after cleansing your face, and then leave it on for a few minutes while doing other things and rinse it after the mask hardens. And you're left with a soft, smooth, and glowing face.

What I didn't like about the product: Because the masque comes in a tube, sometimes I have difficulties getting the product out. The masque smells like toothpaste, so sometimes I feel I have toothpaste on my face. I probably wouldn't recommend this for people with dry skin since it might get too drying. The packaging could be better, and it can make people iffy because of its appearance. Since the mask is minty, people with sensitive skin might not like the tingling sensation or how it feels when the mask hardens (your pores will feel really tight). I didn't really experience any burning sensation after using this product, but I've read that some people have.

Overall: This product has become a staple item in my skin routine. It definitely delivers great results and very affordable.
Share:

Guilty: My 5 Beauty Crimes

I was actually trying to avoid this, but Lady Jane and Leeshengee has tagged me for my five beauty crimes. I'm embarrased to say this, but yes, I've commited a few beauty crimes of my own. I've probably maxed out my three-strikes-your-out rule a looooong time ago, and have repeat violations. This is sad but here goes:

1. I "forget" to wash my face at night. I actually just did this too last night *embarrased*. When I'm extremely tired or inebriated (on RARE occasions), I have a tendancy to trick myself I'm only going to "take a SHORT nap" first before I wash my face, when really, it's a nonstop train to Dreamville. And then, I wakeup at the buttcrack of dawn realizing what I've done, and rush to the bathroom to finally wash my face. And when I don't stick to my routine, I seem to get a pimple on the same spot on my cheeks as a punishment. I can actually feel one coming out right now :(

2. I sneak a pull on my eyelids when applying my eyeliner. I've been really good in avoiding this though especially that I used a gel liner or even with a pencil since I practically got lining my eyes down without the need to pull. I really hate watching makeup tutorials and seeing them pull their eyelids when it comes to the eyeliner part. It makes me cringe! It's like: "What are you doing!?! You're only asking for wrinkles in the future." Anyway, I become one of them when I'm in an extreme hurry and I don't have the time to sit in front of the mirror to line my eyes. So I quickly tug my eyelids and line my eyes. What a hypocrite :(

3. I reuse a "dirty" brush. Yes, for a germaphobe... I'm notorious for doing this. I mean I really don't care for powder eyeshadows since it's dry enough that bacteria can't live in there. But when it comes to paintpots, it's just unacceptable. Because it's a cream product, it has moisture for bacteria to actually thrive in it. I still dip my dirty brush in there because again, I'm in a hurry to get out of the door to head down to work or school. You would think that with all the brushes I own that it won't be possible. But trust me, I've gone through ALL of my brushes (except the new ones) at one point in time that they were all "dirty."

4. I end up touching my pimple. Sometimes, my pimple can get pretty itchy so I try to scratch around it. I mean I don't pick and poke it or even try popping it. But the scratching is still interacting with my unclean hands.

5. I let my brows go ungroomed. I knowww......really bad. But sometimes I don't have time to sit and pluck my eyebrows. I refuse to get it waxed because I don't want to pay for it since it'll grow back in a week. Nothing is more unattractive than ungroomed brows. No matter how nice your eye makeup is, the Sasquatch by your eyes is a big distraction.


So what are your five beauty crimes? Are you as guilty as I am? If you read this, you've been tagged.
Share:

Tuesday, March 25, 2008

How to: Remove and Clean False Eyelashes

This is probably a no-brainer, but when I recently started using false eyelashes, I peeled that sucker off my lids because that's what the packaging said on how to remove it. Well, the glue is sticky. It was a pain getting them off and I was losing lashes along the way. And getting a glue out off your lashes by pulling it with just your fingers will makes your pretty and long fake lashes sparse. So here is a way to minimize the pain and prolonging the life of your falsies.

What you'll need:
* eye makeup remover (or extra virgin olive oil)
* clean container
* cotton swab
* tissue
* tweezers
* lash comb

To Remove:

Step 1: Take the cotton swab and put your eye makeup remover of choice or the extra virgin olive oil (EVOO) (for this illustration, I opted for the EVOO). Make sure it's not soaking wet, this stuff will get in your eye.


Step 2: Dab and swipe some eye makeup remover/EVOO along where the lashbone of your falsies on your lids. Try to avoid your eye as much as possible. Using a cotton swab, as opposed to rubbing a cotton ball, will help maintain the shape of your falsies.


Step 3: Let it the eyemakeup remover/EVOO sit for awhile and let it work its magic.


Step 4: After a few minutes, you can pull your falsies starting from the outer lid. Your false eye lashes should come off easily. If not, repeat step 2 and 3.


Step 5: After you've taken falsies off the other eye, clean the rest of your eye makeup and your face, and you're done!


To Clean:

Step 1: Put your lashes in a clean container, and soak it a bit with your eye makeup remover (I wouldn't suggest cleaning it with EVOO. However, you can substitute with a soapy water).


Step 2: Let your lashes soak in your eye makeup remover for a bit.


Step 3: Then take your falsies out of the container, and while holding where the lash hairs are, gently pull off the glue on a lash bone using a tweezer. Or you can wipe your lashes off with tissue in the direction away from the hair of your fake lashes to get the glue out. The glue should be really soft enough and less sticky that it won't tug any hair off.


Step 4: Let your lashes dry on top of a clean tissue. Groom it with a lash comb if necessary. Then store it back to the packaging after it has completely dried. And you're done!


As you can see in the picture, the falsies to your right does not look as nice as the one on its left. Why? Because I made a mistake and pulling the glue off with my fingers. And since the glue is still sticky, I'm pulling off some hair along with it because I'm yanking it off (I wasn't thinking then). I know this can take some time, but your eyelashes grow much slower. The lashes you lost from pulling your falsies straight out of your eye takes about 8 weeks to grow. So if you're taking the easy way out frequently with your falsies, you probably have less lashes compared to when you started. This will also help in extending the life of your lashes, so you don't have to replace them right away.

If you guys have any questions, please let me know. I hope this helps.
Share:

Monday, March 24, 2008

Depotting Milani Eyeshadows (How To)

I finally depotted all my MAC eyeshadows that were still housed in pots a few weeks ago. It took some time, but I'm just happy I finally have them in my pro-palette, and I can finally take the empty pots to Back2MAC and get my freebies.

Anyway, I also had some Milani eyeshadow that were in need of depotting (Milani e/s are the same size as you MAC e/s in a pan). I didn't really have any idea on how to this, so it was a trial and error on the Milani eyshadows I owned. After a few attempts and one busted eyeshadow, here is probably the best way to depot your Milani eyeshadow, without cracking it, in ten steps. Remember you must be very careful with the whole procedure to avoid any casualties.

What you will need:
* your Milani e/s
* rubbing alcohol
* clean paper towel
* cotton ball/tissue
* paring knife
* clean container
* dropper (optional, or if available)
* MAC palette


Step 1: Find an area to depot your eyeshadow. Make sure you place a clean paper towel on your work area.


Step 2: Peel the label off at the bottom of the pan. You will then see a small hole hiding under it.


Step 3: In a clean container, pour a small amount of rubbing alcohol.


Step 4: Take your paring knife (or a dropper) to take some rubbing alcohol.


Step 5: With the help of your paring knife (or dropper), carefully put some rubbing alcohol in the hole at the bottom of the pot of your eyeshadow. This will help loosen up the glue inside. Get about 3-5 drops inside, then let it sit for a few minutes.


Step 6: Flip your eyeshadow top side up and find a space in between the pan and the pot. CARFULLY insert your paring knife in between the space while CAREFULLY wiggling the pan off the pot. You can try and go around the pan, and make a bigger space. This will help the alcohol kinda move around inside and pop the e/s pan out.


Step 7: Pop the pan off the container. Maintain a steady hand since you're inserting a paring knife in a small space (which is why my e/s in this picture is nicked). Do not apply too much pressure when popping the pan off. You will break your e/s. If the pan won't readily come out, put some more rubbing alcohol in the hole, and let it sit a little bit longer. Patience is key!


Step 8: Once you've popped the pan out, clean the bottom of the pan with rubbing alcohol and a tissue or cotton ball to remove the glue.


Step 9: Place a round adhesive magnet at the back of your pan. You can put a sticker label on top of your magnet if you wish.


Step 10: And TA-DA! You're Milani Eyeshadow is ready to be housed in your MAC pro-palette.


I hope this helped some (at least one) of you. Now you can depot all your Milani eyeshadows and put them in your MAC palette. Remember patience is the main thing you need when doing this. So don't take your anger out on your poor eyeshadow. If it won't budge, try to put more rubbing alcohol. Happy depotting!
Share:

Wednesday, March 19, 2008

Product Review: Monistat Soothing Care Chafing Relief Powder Gel AS A PRIMER?!

This is not anything new if you've been lurking around beauty blogs and beauty forums. I recently just learned about this after reading some entries from Alienman and Stefunki (old blogsite)'s blog but was a wee bit skeptical about using this product on my face until I read up more about it. Then after a few more researches, I decided to give it a try.

For a picture of how the product looks like, Vanessa, has comparison pictures of it with her Camellia Soothing Primer.

And for some of the people thinking, "Eeew? Yeast infection medication on your face? Are you crazy?" or something of that nature, please be aware that this particular product IS NOT MEANT to treat yeast infections. You are simply associating the name with the product since Monistat is the MAKER of a popular yeast infection cream. They created another branch of their company which is the Soothing Care line for other symptoms that is geared towards for relief of the skin (learn more about here).


Also, if you end up deciding trying this product out after reading this review, you can request a sample from their website. Click here for more details.


What the Product Claims:

Relieves & prevents chafing. Inner thigh & bikini area. From moisture, heat, movement & shaving. Dries to silky finish. Fragrance free. Skin protectant. Breakthrough form - Dries to silky finish. Provides on-the-go daily prevention and relief from chafing and irritation of skin in intimate, delicate areas like the inner thigh, bikini area, under arms and breasts. Made especially for women, the exclusive Power-Gel formula combines the protective benefits of lotion and powder by forming a silky, breathable moisture control barrier to fight friction. Delicate skin feels healthy and protected from the uncomfortable irritation caused by moisture, heat, movement and shaving. Also helps reduce the appearance of redness that can develop after shaving or waxing the bikini area. Works with just one application and is gentle enough to use every day. Non-greasy. Fragrance free. Non-irritating. Non-staining. This product is not intended to treat yeast infections.


Ingredients:

Active Ingredient: Dimethicone (1.2%). Inactive Ingredients: Cyclopentasiloxane, Dimethicone, Dimethicone/Vinyl Dimethicone Crosspolymer, Silica, Tocopheryl Acetate, Trisiloxane.


Monistat Soothing Care Chafing Relief Powder Gel's Report Card:Quality: 4 out of 5
Product: 4 out of 5
Price: 5 out of 5 ($6-8 available at your local drugstores)

Overall: 4.3 out of 5

I never really cared so much on using primers as a base for my foundation. Let alone, Monistat on my face. I've only tried two primers: Napoleon Perdis Auto Pilot Primer, which if you can recall from my previous post has been the root of my acne problem which is why it made the cut for my five beauty must NOT haves. And the Philosophy Present Clear-Makeup Primer that also didn't cooperate with my skin (maybe because it contained two parabens: Methylparaben and Propylparaben). It had to go no matter how much I love Philosophy products. I never really saw the point in adding an extra step in my morning routine. Until I tried this product and changed my mind.


What I like about it:
Because Chafing Relief Gel main ingredient is Dimethicone, it's a great alternative to your expensive primer since this is also the main ingredient found in other primers. Dimethicone creates a breathable barrier between your skin and foundation to protect it from the bad stuff yet allowing your skin to breathe and not clog your pores. This product gives my face a matte finish after application. At the end of the day, my makeup still looked as fresh as it did as if I just applied it. My blush color stayed on longer too! And I just definitely loooove how my skin looked. My face looked even and shine-free. Usually at the end of the day, I get pretty oily on my t-zone which is why I carry blot papers with me. As vain as it sounds, I kept looking at my face in the mirror just to see how great my skin looks with Monistat underneath my foundation. It was really put to the test yesterday because of the warm weather. No oilies at all.

Also, I haven't broken out from this product which makes me love it even more. I guess it's because of the fact it's light and doesn't have a thick consistency compared to the previous primers mentioned. Also, it doesn't have any scent or parabens that can probably trigger irritation or adverse reaction.

And lastly, it is multipurpose! Just finished shaving? Slather this on to minimize any irritations. Wearing shoes with out a sock or your sandals rubbing against your skin causing friction that it hurts? Apply it to the affected area. This product is genious! And the fact that it's cheaper than branded primers and it's available in drugstores is a plus.

What I don't like about it:
It can be pretty difficult to find sometimes in certain stores. Some stores don't carry a big stock of this. And nothing else really.


Share:

Tuesday, March 18, 2008

Product Review: Ly-Na Face Pearl Cream

Sorry for the no post yesterday. I got into an accident on Sunday (wasn't my fault), so I had to take care of some things. It wasn't that bad. Just the front bumper. But the guy who hit me was very nice and civil with me when it happened. I was just shaken up a bit about the incident since it was my first time, but I'm OK :]. Also, my boyfriend was back from Hawai'i and came home sick. So I had to take care of the poor baby and find out what goodies he got me from his trip heehee.

Anyway, with numerous posts about the Top-Gel Pearl Cream or any other pearl creams for that matter, here is the pearl cream I've been using for over a month now. I've raved about this product a million times, but this is my review.


What the Product Claims:


Actions: Removes blackheads, pimples, ephelis and wrinkles.

Direction: Cleanse your face, apply the cream and message for 2 to 3 minutes, once in the morning and at night.

Active ingredients: Stearic Acid, Centanol, Lanolin, Glyceryl Monostearate, Isopropyl Myristate, Sulfur, Perfume, Ion Exchange Water, Glycerine, Potassium Hydroxide, Pearl Powder.

Warnings: If your acne becomes worse, it is because you haven't properly cleaned your skin prior to application. When using this cream, protect your skin from sunlight.The pearl powder indeed possess the requisite factors in keeping your skin healthy. It will enable your face to be soft and lustrous.

What I like about it:
It definitely faded my old acne scars. After a month of use, you can barely tell I had acne at all on my cheeks. I do still get a couple of pimples here and there, but not anywhere on my cheek. My usual breakout spot is my forehead (always has been), probably because of my bangs. Back in the days, at the end of high school and the beginning of my early college years, my skin has always been flawless. I never had to worry about a zit popping ever or using cover ups. Never used foundation either because I didn't have to. It wasn't until I started using Bare Escentuals because of all the hype that was going on about it (one thing I learned is never believe the hype) when the problem started. After that everything just started going down hill from there.

I seriously tried everything when it comes to acne treatment and getting rid of scars. You name it, from Proactive to Murad, and Neutrogena to Clean&Clear, Clinique to Shisiedo. None of them work as well as this. It definitely has evened-out my skin a lot better, and got rid of the nasty acne scars that I thought will never go away. Now, I really don't have to worry about not having foundation on to cover up my face. I can walk out of the house without any.

And, another funny thing that learned recently is that my mom used it too during her younger years! She found out I was using it last night when I walked by her and she said that it smell like Ly-Na (well duh it was). She recognized it because of it's distinct smell. She told me it was really popular during her time, and it's been tested over time that it's to help acne problems and for younger looking skin. She found it hilarious that I even got a hold of one since she didn't think they actually sell it here in the U.S. or that I would even know about it. She also said that this product actually works better than the high-end creams sold in department store counters, and thinking about going back to using it since she knows where to get it.

IT'S ALSO CHEAP! Less than $4 at your local Asian herbal stores or supermarkets. It'll last you awhile since the cream can be pretty heavy if you put on a lot. So a small amount can go a long way.

Also, the instructions that the cream came with is pretty humorous. I'll post it once I get home.

What I don't like about it:
THE SMELL. It smells like an old lady which is how my mom recognized it. It's also pasty white when applied on your face, so I don't recommend this for daytime use or slathering too much on your face (can clog your pores). I only use this as my night cream. It might be hard to find unless you live in a predominantly Asian community. The packaging can be better, but doesn't really affect the quality of the product. Other than that, I don't have anything else bad to say about it :]!
Share:

Tuesday, March 11, 2008

Mineral Samples or Pigments Storage Ideas

I know some mineral makeup stores give out samples in a ziplock baggie, but as a personal experience, dipping your brush inside the bag can get a bit challenging and messy. And if you do stash it in your makeup bag or when traveling, chances are you can rip the bag or poke a hole in it and make a bigger mess. So as I wait for my samples, I decided to go look for some containers where I can store them. You can always buy those sample jars at e-Bay, but I don't have the patience to wait and bid, and pay for shipping. Luckily, I found an alternative storage solution at (where else?) the painter's section at my local Micheals.


Mix & Save ($2.49 for a pkg of two; 8 containers per link):

What I like about it: I personally like this one better. The a row of containers are linked together, so you don't have a bunch of jars to sift through. The containers are translucent, so you'll be able to see your color and air tight when closed. Great for traveling. I can consider it almost like a palette for your pigments or mineral makeup eyeshadow. The connectors that link the containers together are not flimsy at all. And it's cheap!
What I don't like about it: You can still make a mess when opening it. Since the caps close tightly, if you fill up the container up to or a little bit before the rim and pop the lid off, it can get messy (so I suggest you don't). You have to be careful when you open the container since you're simply not unscrewing the lid. Also, since the containers are linked together if you have more than one container open, then you have another opportunity to make a mess. Lastly, the hinge connecting the cap and the container may break after awhile since it is plastic, but that's a very minor problem. If it does break, you can just cut the excess plastic off.


Buddy Caps ($3.49 for a pkg of 12):

What I like about it: This one is a bit bigger in size compared to the Mix & Save container. This is also airtight when closed, but it's not linked together. The container is also translucent for easy viewing of your pigments or mineral makeup. Still great for traveling.

What I don't like about it: The lids needs to be popped off to open.


Contact Lens Case:

What I like about it: You can find it almost anywhere.

What I don't like about it: You can't see the colors inside.


And when foiling your eyeshadow, you can use a painter's palette ($0.69). It'll keep your eyeshadows fresh since you're not directly dipping a damp brush on your pigment or mineral eyeshadow.


Share:

Product Review and EOTD Using Revlon Make a Sheen Olive It Up eyeshadow

Sorry, no full face fotds. Maybe next time :)

Anyway, here's the eye look that I came up with Revlon's eyeshadow. I used MAC Soft Ochre as a base, Sephora brown eyeliner for the upper and lower lashline, and Vaseline as my "mascara."


Revlon Make a Sheen Olive It Up Product Report Card:

Packaging: 4 out of 5
Color Payoff: 3 out of 5
Quality: 3 out of 5

Overall: 3.3 out of 5

Swatches:


What I like about it:
The eyeshadow is packaged in a chic, see-through plastic casing using the eyeshadow itself as part of the "design." The colors are wearable for those who are not into bold looks and for simple daytime looks. I also like the color combination of this product. It has your eyelid, crease, and highlight color.

What I don't like about it: The goldish color in the middle comes out in chunks on your lids. I also literally had to dig through the eyeshadow with my brush just to get to get some color. The colors seems to be sheer except the brown. I had to really packed it and sweep the color a few times before I actually got the color I wanted. And the way the eyeshadows are set up, it can cause your eye makeup to get muddied up since the color can get to the other color next to it. The goldish color in the middle is also too skinny that it's difficult not to touch the eyeshadows next to it.

Final say: I would hold on to my $10. Milani or NYX are cheaper alternatives that'll give you a better payoff than this particular Revlon eyeshadow.
Share:

Sunday, March 09, 2008

Rimmel Eye Magnifier Mascara (Review)

Here's my review for the Rimmel Eye Magnifier Mascara.

What it claim it does:Ultra-extending, eye opening mascara. Unique Eye Magnifier applicator. Body boosting formula For 70% more vertical lashes and outstanding lash lift. Give them an eyeful!

Rimmel Eye Magnifier's Mascara Report Card:Lengthens: 3 out of 5
Volumizes: 2 out of 5
Curls: 2 out of 5
No-clumping: 1 out of 5

Overall Rating: 2 out of 5
Final Verdict: TOSS IT!

So again, here's my clean, bare lashes for comparison purposes:


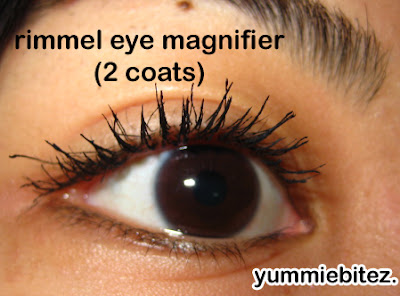
Using Rimmel Eye Magnifier Mascara:


Comments:
The reason I ended up purchasing this mascara was because a friend of mine was using this. I saw her lashes where uber nice and she raved about it so much. So I thought to give it a shot.
The mascara wand had the newer plastic ones and not your traditional wands with the bristles.The mascara did lengthen my eyelashes a bit after the first coating, but the second coating only weighed my lashes down. The bristles also does a poor job in separating the lashes nicely therefore it clumped my lashes as seen in the pictures. And the one thing I hated about it was it took longer for me to use since I have to bust out my eyelash comb. I never had to use that until now. And even with the comb, it didn't really help out with clumping since the mascara really dries quickly and really hardends your lashes causing it to become a bit brittle which is more prone to breaking. Also, as the day went on, flakes started to fall on the corner of my eye making me tear a bit. The mascara also lacks to hold the curl. I personally didn't like how my lashes looked after application. It looked very fake to me and it does seem that you slathered on ten coats of mascara when in fact it was only two. So this one is a no go for me.
Share:

Saturday, March 08, 2008

Milani Eyeshadow (Swatches)

Whoo! I have permission to post now. And because of that I'm not getting any reading done for my midterm on Monday.

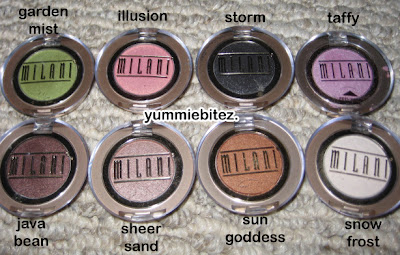
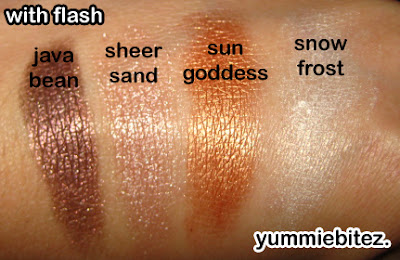
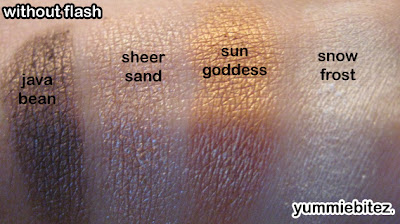
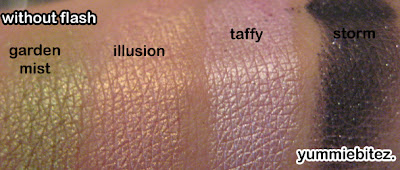
Anyway, here are some Milani Swatches. Like Vanessa had mention in her previous post, these eyeshadows might be becoming obsolete in some stores that carry them because they might be replaced with the wet/dry eyeshadows. But I'm not sure if this is the case. However, I was lucky enough to find them in Target or Walgreens. I personally like these better because it has less glitter in it, and the fact that it fits in my MAC pallet! Target carries this for $2.99 while Walgreens retails it for $3.49. Target has cheaper prices but minimal to almost nothing in stock whenever I go. Walgreens however had a whole buttload of them in stock and more variety in colors.

I still love MAC eyeshadows. But Milani eyeshadows aren't so shabby for super cheap makeup. NYX cosmetics still trumps all when it comes to cheap makeup though.

These swatches by the way were applied without a primer underneath.


Finally have a post with some pictures on it :)
Share:

Friday, March 07, 2008

Reader's Question: Scarzone vs. Pearl Cream

Question from lovethatlook

hey anne,

i think my skin is just like how yours used to be! I used to never get acne on my cheeks and then wham, there they are. Now I'm dealing with the scars AND new acne still rising there. How long should I use Scarzone till I switch over to the pearl cream?


yummiebitez says:

Well, I initially used ScarZone specifically for the scar/infection mark from my nose piercing in the hopes that it'll make it less noticeable (I had a nose piercing before and it got infected. I'm sure ya'll prolly thought it was a mole on my nose.. but it's not. But that's another story), and not for my acne scars. Then I read somewhere (and of course I forget where) that ScarZone also helps with acne scarring too. I just started using it again since it was just sitting there for a while since I stopped using it for my scar on my nose, and didn't want it to go to waste. And at the time, my face was starting to clear up, and I was pretty much looking for a remedy to help with the acne scarrings. I used ScarZone every night and morning for about a month, and I must say it did help minimize the appearance of my acne scars on my cheeks. However, I stopped using it after a month since I noticed that I was starting to get tiny bumps on my face where I applied it, and I felt that it wasn't working on me anymore. That to me was a signal for me to stop.

Then I would say about a few weeks later, I decided to try the pearl cream. I was a bit hesitant about it since I've never heard about it, and the packaging wasn't just appealing to me (I know, just because the packaging sucks doesn't mean the product doesn't work). But after reading reviews and seeing results from Anna and Fei, I decided to give it a shot and went to the closest Asian market to buy it. Since then I just started using it every night, only because it makes you face looks white and pasty.

Anyway, to answer your question, I suggest that you use one or the other. You don't necessarily need to try both of them in my opinion. The reason I made a switch was because I was merely trying to find a product that works out for me the best. I feel that the pearl cream work better for me since I actually saw results within a week and with less application, whereas ScarZone took about a month with twice a day application. But if you want to try both of them, make sure you stop the previous product you're using for at least a week before introducing a new one, so that you're skin has that time to rest. It'll also help you determine whether or not the new product is working for you.

As for now, I'm still using pearl cream, but just every other night. I don't want to get overzealous in using it every night because it does make your face lighter. It is pretty much a whitening cream. But, I did pass on my ScarZone tube to my friend. She's been using it and she's very much grateful for it because she said it really works, and now she got her roommate to use it too. It just really depends on your skin and how it will react to it.

Some tips for when using pearl cream:

I'm not sure if all pearl creams have the same consistency, but the one I'm using is pretty solid that you kind of have to wet your hands so you can get some on your fingers. I suggest dampening your fingers a bit with toner to help. Pearl cream is also pretty thick, so try to apply it as thinly as possible to your face. Last time I did this, I got a zit the next day. If you put on too much of it, it can and will clog your pores. So again dilute it with toner. I suggest that you use a non-alcholic toner (make so sure of it that it doesn't have alcohol in its ingredients!!). Try Nivea Visage Moisturizing Toner.

And I hope this helps.
Share:
Blog Design Created by pipdig