Tuesday, March 14, 2017
Full Face Using Drugstore Products ONLY!
Here's a video tutorial of how I did my makeup using drugstore products only for an "everyday" glam look. Who said that you have to spend an arm and a leg to do your makeup and feel glamourous? Drugstore brands have been really amping up the quality of their products, and giving the high-end makeup brands a run for their money.
In the video, I show you step-by-step how to achieve a very simple yet glam look using affordable drugstore products. The look is meant to enhance your features while still some what keeping it natural. It's a very easy makeup tutorial without doing too much.
Sunday, December 04, 2016
November 2016 Beauty Favorites

I've rounded up some of my favorite beauty products for November. Watch why I've been loving these beauty items. Let me know if you have tried them out too!
November Beauty Favorites
• bliss Fabulous Foaming Face Wash* - This is my current face wash that's part of my skincare routine. I like how this face wash cleanses and gently exfoliates your skin at the same time. It has very fine exfoliator bead that doesn't feel abrasive on the skin which makes it a great exfoliating cleaser for everyday use. I didn't find the cleanser drying on my skin; however, I haven't been using my Foreo Luna (review: February 2016 Favorites) as much while using this face wash since it becomes a little too much for my skin to handle.• Benefit Cosmetics It's Potent Eye Cream* - I've only recently incorporated eye cream into my skincare routine. I've previously tried one other eye cream before this and didn't get a good experience on it as it left little tiny bumps around my eyes. I've been loving the Benefit Cosmetics It's Potent Eye Cream because you really only need a little bit of it to moisturize both eyes. I light dip my ring finger into the jar and simply lightly dab the eye cream under my eyes. I've noticed that my eyes look much more refreshed after using it.
Saturday, August 20, 2016
Back-to-School Drugstore Makeup Tutorial
Back-to-School has officially begun for some, so I've created a makeup look to help you look your best (or at least awake) in school using drugstore makeup. Here's a look that I would wear to school (if I were still in school). I created a simple look that's easy to recreate even if you're in a rush in the morning. When I was in college, I mainly used drugstore products when it comes to doing my makeup. Being a college student, buying makeup can be a bit of a luxury. But with good drugstore makeup options these days, you can enhance your look without breaking the bank.

Friday, February 12, 2016
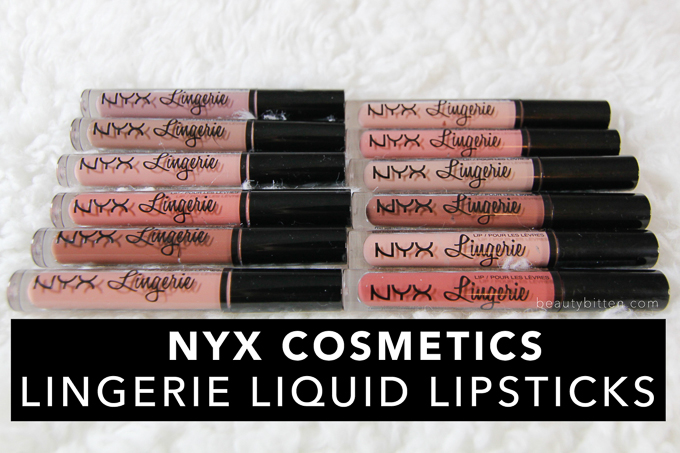
NYX Cosmetics Lingerie Liquid Lipsticks (Review & Swatches)
As promised from my last beauty post, a product review! If you haven't seen my latest video yet, I did a first impressions and swatch video on these NYX Cosmetics Lingerie Liquid Lipsticks. You can watch my reactions as I apply these liquid lipstick one by one for the first time. This is a more in depth review after I've worn and tried it out for a few days. I'm also providing photos of me wearing these liquid lipsticks on this post (so you can see how they photograph as well).
Before I begin, I also just want to mention that I almost forgot how much time it takes to draft a product review (from taking photos, writing this post, etc.), especially if it involves swatches. I quickly realized this as soon as I started working in this post. It's been awhile since I've done a beauty product review, but after working this one out, I think I figured out a method. But, it made me appreciate other beauty bloggers who does this on the daily. I mean, just swatching 12 different lip colors was a feat itself.
Price: $7
Available at: NYXcosmetics.com and Ulta.com
What it claims: Slip into something seductive with Lip Lingerie, our new weightless liquid lipstick with a plush matte finish. Available in a range of color-kissed nudes—from cinnamon pink and chocolate brown, to warm mahogany red and classic nude beige—each sultry shade will coat the curves of your lips with irresistibly creamy color (from the NYX Cosmetics website).
Photos, swatches, and review after the break...
Before I begin, I also just want to mention that I almost forgot how much time it takes to draft a product review (from taking photos, writing this post, etc.), especially if it involves swatches. I quickly realized this as soon as I started working in this post. It's been awhile since I've done a beauty product review, but after working this one out, I think I figured out a method. But, it made me appreciate other beauty bloggers who does this on the daily. I mean, just swatching 12 different lip colors was a feat itself.
NYX Cosmetics Lingerie Liquid Lipsticks
(Available in 12 colors)Price: $7
Available at: NYXcosmetics.com and Ulta.com
What it claims: Slip into something seductive with Lip Lingerie, our new weightless liquid lipstick with a plush matte finish. Available in a range of color-kissed nudes—from cinnamon pink and chocolate brown, to warm mahogany red and classic nude beige—each sultry shade will coat the curves of your lips with irresistibly creamy color (from the NYX Cosmetics website).
Photos, swatches, and review after the break...
Tuesday, September 20, 2011
Wet 'N Wild 3-Pan Color Icon Palette (Review and Swatches)
So for the longest time, I've had these palettes stashed in my drawer. I took advantage of a previous Buy One Get One Free at my local Rite Aid by getting whatever palettes my hands can grab.
I have to admit that I was a little bit weary of trying these eyeshadows out. I have tried Wet N' Wild products before and I found them to be either too sheer or too chalky for my liking. So these palettes were definitely a sweet surprise when I found out that they were much better in quality than I had expected.
Click the link below for the review, product images, and swatches.
Wednesday, July 13, 2011
NYX Super Skinny eye Marker in Carbon Black (Review)
Eyeliner is essential in my makeup bag. I used to be a gel liner user up until I discovered the convenience of liquid eyeliner (as I have also mentioned in my previous review). Prior to using NYX's Super Skinny eye Marker, I used something similar which is the e.l.f Waterproof Eyeliner Pen.
Friday, May 20, 2011
Almay Liquid Liner (Review)
Prior to my beauty expeditions, I have stayed away from liquid eyeliners. They were never my favorite because my hand lacks steadiness to apply it which makes my eye makeup looking like a mess. But after a few practices with gel liners, I was able to transition to using liquid eyeliners like a pro.
Thursday, April 14, 2011
NYX Cosmetics The Black Label Lipstick (Review and Swatches)
As I first started my makeup journey, one of the brands that I fell in love with was NYX Cosmetics because of their price point and quality. Back then, searching for NYX cosmetic products was like a treasure hunt. They weren't easily available before, but I'm really glad they are now. More websites and stores, including Urban Outfitters, carry NYX Cosmetics. I used to only find them at some store in the outlets or during IMATS or other trade shows I would attend. But, I do remember back in the days, few years ago, when it was such a big deal when CherryCulture would have round lipsticks for $1! I pretty much hoarded all the colors. Good times.
NYX Cosmetics The Black Label Lipsticks
Price: $7.50 (buy here)
Available at: NYXcosmetics.com
Find out more of what I have to say by clicking on the link below!
NYX Cosmetics The Black Label Lipsticks
Price: $7.50 (buy here)
Available at: NYXcosmetics.com
Find out more of what I have to say by clicking on the link below!
Monday, February 28, 2011
Rimmel London Lasting Finish Lipsticks (Swatches)
L to R: Drop of Sherry, Airy Fairy, and Bordeaux
Drop of Sherry: shimmery deep rose color
Airy Fairy: pinkish/lilac nude color
Bordeaux: deep red wine color
Drop of Sherry: shimmery deep rose color
Airy Fairy: pinkish/lilac nude color
Bordeaux: deep red wine color
Friday, November 19, 2010
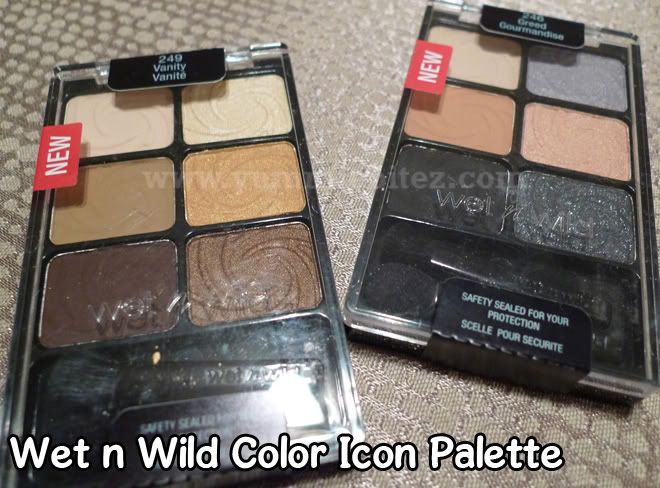
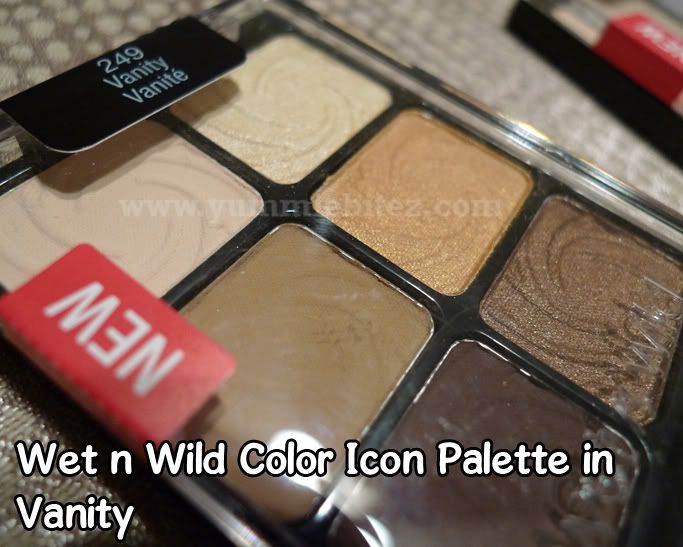
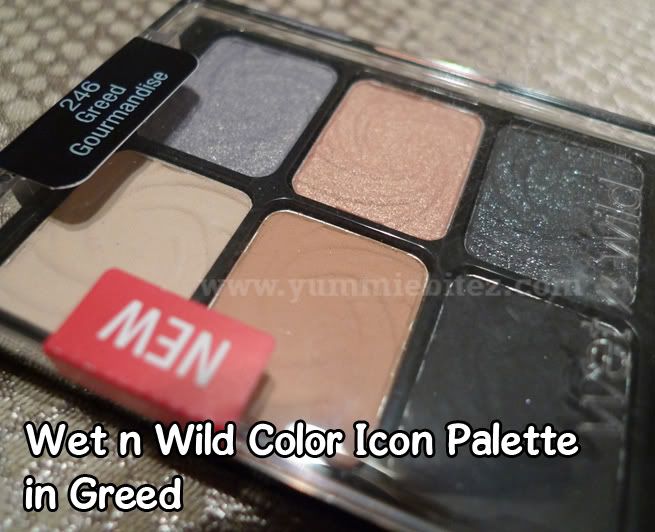
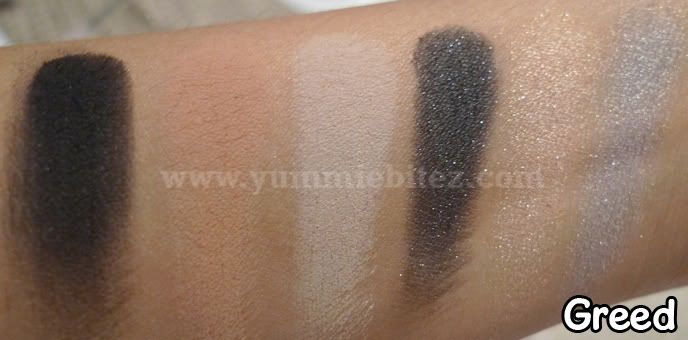
Beauty Review and Swatches: Wet n Wild Color Icon Palette (in Vanity and Greed)
Wet n Wild Color Icon Palette
Drugstore brands can be a hit or miss, but sometimes you'd just be amazed on the gems that you do find. On a previous and random trip to Rite Aid, I came across these Wet n Wild Color Icon palette that I've also been hearing a lot of buzz around it. At the time of my purchase, the palettes were buy one get one free, so I took that as a sign that I should grab them and give it a whirl. For about $5 for both palettes, it's almost hard to pass them up.
Prior to this trip, the only product that I've tried from Wet n Wild were their nail polish... back in high school. I mean c'mon, they're only a dollar each! I haven't really tried their eyeshadows before, so the Color Icon palette would be the first one.
Packaging:
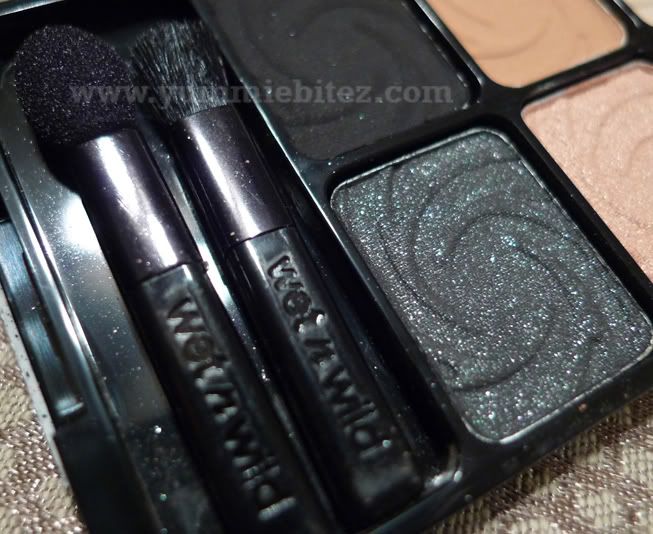
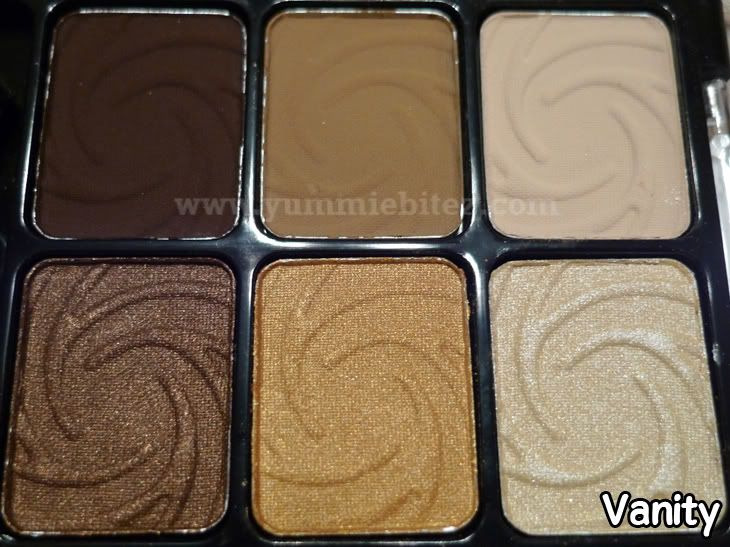
The Color Icon Palette contains six coordinated shades. It is encased in a black plastic glossy case with clear cover. The palette doesn't come with the mirror, but I like how the cover itself is clear. There is no guessing here with which eyeshadow colors are in a palette. When you have a massive collection of makeup (not that I'm anywhere near that), it's the small things (like having a clear cover to determine which eyeshadows are in that palette) can be a pretty big deal. Although they way the eyeshadows are laid out kinda reminds me of the old MAC Holiday sets minus the fancy packaging.
The palettes are also compact enough to stow in your makeup purse for those last minute touch ups or even when you're in a hurry and you need a little pick me up. Like most drugstore makeup, these palettes come with tiny sponge tip applicators (that you'll probably not use). The packaging is not much on the cute side, but it's is more on a more practical side.
Quality:
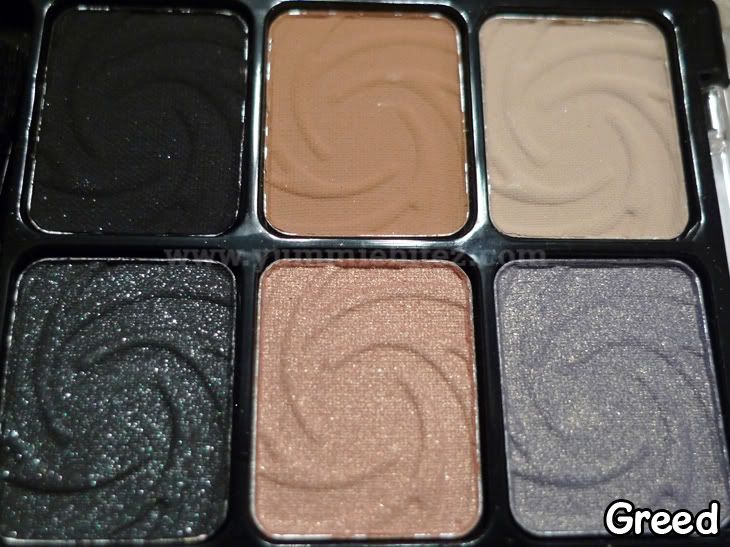
The quality of the eyeshadows in the palette is decent to great. Wet n Wild's Color Icon palettes has three matte shades and three shimmery eyeshadows. These eyeshadows have great color payoff especially with a good base. Although the matte eyeshadows are slightly chalky, it didn't cause too many fall outs. I really liked their darker matte eyeshadows as my crease color as they blended pretty well on my lids. However, I did find some of the shimmery eyeshadows a little difficult to work with since they were a little bit on the sheer side and they can get a bit blotchy. These were also the ones that easily faded when colors are blended. The eyeshadow with glitter (found in the Greed palette) surprisingly didn't cause major fallouts when I tried it. Glitters can be annoying sometimes because they're a pain to take out when it ends up on your face. All-in-all, I was pretty happy with what the Color Icon palettes has to offer.
Value:
No doubt about it that this palette is almost a steal for six eyeshadows with decent pigmentation. It is even better when there's a promotional sale going on at your local drugstore. It's a good palette to have whether you are a beginner with makeup or already way ahead of the game. And with the holiday seasons quickly approaching, these palettes will make a great stocking stuffer.
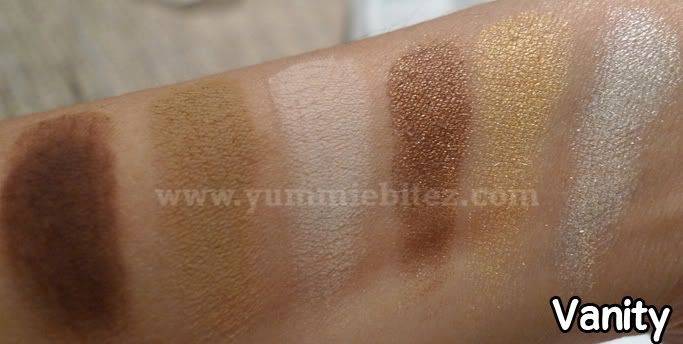
Swatches:
Wet n Wild's Color Icon palettes are one of my favorite drugstore finds. They're stepping their makeup game up by improving the quality of their products yet still offering them at an affordable price. When I'm in a rush in the morning for work, I find myself reaching out for the Vanity palette when I need a no-brainer look. It's a great everyday and natural palette for the working gals who are limited to wear a more neutral look. And if you want to transition your look to a night time look, just grab your Greed palette and smoke those eyes out.
Rating: 4 out of 5
Thursday, November 18, 2010
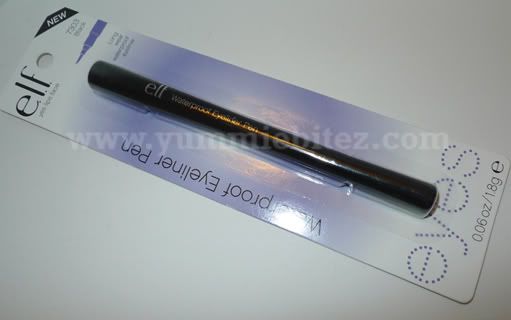
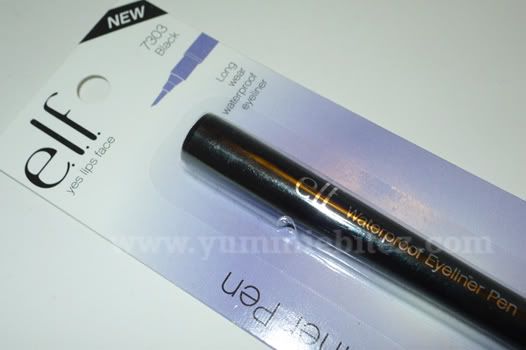
Beauty Review: e.l.f Waterproof Eyeliner Pen


e.l.f Waterproof Eyeliner Pen
From the most recent event that I attended, hosted by Beautylish, they were handing out all sorts of makeup swag for us to try. One of them happens to be this e.l.f Waterproof eyeliner. I was actually interested in trying this out since I was on a hunt for a good inexpensive eyeliner. For a dollar, you can't get anymore inexpensive than that.
I haven't had the chance to try any e.l.f products up until now. I've always been a bit wary due to the negative feedback I've been reading or hearing about their brand. Regardless of what I knew or heard, I kept an open mind that maybe this one will work out for me.


Day one of my trial run, the bf and I planned on a trip to a flea market in LA on a Sunday afternoon. It was a bit of a gloomy day, but the weather was pretty warm, around the mid-70s, and it was perfect. I didn't want to put too much effort in getting ready that day, so I just lined my eyes using e.l.f Waterproof eyeliner pen and put some mascara on.
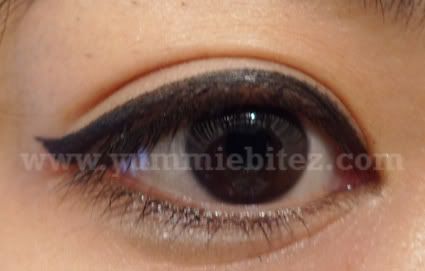
Because the eyeliner was in a pen form with a felt tip application, lining my lashes with liquid eyeliner was a cinch. I was pretty impressed on how precise the eyeliner pen lined my eyes. It was easy to control how thin or thick you want your line to be. I also didn't have to go back and draw the line again. I did it all in one swipe. I just achieved a cat-eye look in less than 2-minutes. Not bad.
I also swatched the eyeliner on the back of my hand. I tried rubbing it off, and it barely budged. At this point, I was pretty excited already. But little did I know at the time, its staying power would not be applicable on my lids.
After being out and about for maybe two hours, driving, looking for parking, and walking around perusing the local flea market, my bf taps my shoulder and says, "Umm... you might want to check your makeup." I look at him and thought he was crazy since I barely had anything on my face. I checked the mirror anyway. And to my horror, my eyeliner has crept up to my crease!! The line has faded and went north. It was a mess. I almost felt embarrassed since I've probably been walking around like that for awhile. Well, I guess the staying power of that was a fail. For the rest of the day, I found myself trying to clean off mess that my oily lids have created. Not to mention, my eyelids were getting a little itchy. It wasn't stinging, but it was itchy. It wasn't anything unbearable, but it was still itchy.
Day two of my trial run, this time I primed my eyelids with Urban Decay Primer Potion. The eyeliner still creased but it lasted a few more hours longer compared to sans primer. I still found myself checking the mirror and trying to clean up my eyeliner.
As far as removing the eyeliner, it really is waterproof. Although it created all sorts of mess on my eyelids, taking off the rest of the eyeliner will budge with water not unless you use a good makeup remover.
Overall: This eyeliner just didn't cut it for me on warmer days when my eyelids decided to secrete more oil than ever. I probably would only recommend this to people with non-oily lids (as the swatch on the back of my hand didn't really budge) who are looking for an inexpensive liquid eyeliner. This might also be a great practice tool if you want to transition into using liquid eyeliner. Although keep in mind, that it did make my eyelids itch a little. I'd probably only just use this again if ever I need black eyeliner to draw something on my face.
Watch the Video:
Rating: 2.5 out of 5
FTC: The product mentioned was a gift from a previous beauty event that I attended. I am not affiliated or sponsored by the brand company mentioned to write this review. These are my honest thoughts.
Wednesday, October 13, 2010
Beauty Review: Physicians Formula Shimmer Strip Pop Collection
New! Shimmer Strips Custom Eye Enhancing Shadow & Liner
- Enhances Brown Eyes with 3 Color-Coordinated Trios
- High Performance Glamour!: 3 x 3 = Endless Possibilities
- Natural, Playful, Dramatic 9 Custom Shades for the Perfect Brown Eyes
- 3 Trios = 3 Looks, Wet &; Dry = 2 Finishes, Shadows & * Liners = Customized Glamour
- Hypoallergenic, Fragrance free, Dermatologist approved, Safe for sensitive eyes and contact lens wearers
- 3 x 3 = Endless Possibilities!
- Three blendable trios perfectly paired to color, contour and line your eyes for illuminating, high impact.
- Wet & Dry application for two finishes:
- Wet for dramatic, intense color with ultra long-lasting wear. Transforms shadow into a liner.
- Dry for a softer result.
Professionally Customized Glamour
- Make-up artist selected shades enhance your natural eye color.
- Unique, angled pro-sponge applicator allows for perfect blending and precise lining.
- Tip for lining
- Slanted top for applying contour color
- Flat side for applying color all over lid
Why You Might Dig It:
- Compact palette (great for travel)
- Nine array of eyeshadows
- Work-friendly colors
- Easy transition from daytime to nighttime look
- Great color combination especially for brown eyes
- Affordable
- Decent pimentation
- Easily blendable
- Awkward palette packaging
- No dividers in between eyeshadows
- Two of the eyeshadows were sheer (refer to image below)
- Some eyeshadows were chalky

The Nitty Gritty:
This is my first Physicians Formula palette ($9.95), and I'll admit I was a bit skeptic at first. But there was a week when I found myself always reaching out for this palette when I'm doing my makeup (see previous look here and here). It's almost a no brainer putting looks together with this palette whether it be for work or if you want to be get a little creative and playful. With your lighter and darker eyeshadows, it's a cinch to transition from your day time look to your night time look.
As far as the packaging goes, the size of the palette is small enough for travel and has the colors you might need for let's say a weekend. However, I do find it a little odd how the palette opens which I find cumbersome. It can also be a struggle sometimes opening the palette for the reason that it opens sideways which makes it that much more annoying. I feel that I have to be extra careful opening it because of the fear that the cover might suddenly snap off. Also, with the way the eyeshadows are packaged, if you're not within the perimeter of the eyeshadow, you can easily transfer the neighboring color on to your brush since the eyeshadows do not have any sort of divider in between them.
The pigmentation of the eyeshadows are pretty decent for a drugstore brand. They're not the best but it does give you a good color payoff with a good primer or base. Although two eyeshadow colors (indicated in the image above) are more on the sheer side which either requires a heavier hand or packing the eyeshadow for it to show better on your lids. Also, keep in mind that some eye shadows were a tad bit chalky. I did experience some fall-out for some of them, but on a brighter side, they were easily blendable without running the risk of your eyeshadows looking all muddy.
For the price for $10, I consider this eyeshadow palette to be a pretty good buy. It has what you need and it does the job. I mainly like it for those lazy or no-time-to-think-of-an-eye-color-combination days because when you are in a hurry thinking takes too much is not an option. Although the packaging could be better, I suppose you'll get over it sooner or later once you get used to its awkward packaging.
Overall Rating: 3.5 out 5
For more product images,
Sunday, August 22, 2010
Make Brown Eyes POP! using Physicians Formula (Video Tutorial)
For awhile now, I've been trying to figure out how I'm going to squeeze-in pursuing makeup freelancing on the side. After I got my degree, I thought I'd have all these time in the world to go after what I truly love to do. You know when you were in college, you think you'd have all these time in the world for hobbies and just to relax after you've graduated.
Well, not the case. Your priorities actually shift. You start to realize that you actually had more time when you were in school. You have to work full-time to support yourself. It's even more of a challenge when you move out from home. Yes, you do have independence and the freedom, but it comes with a price of having to do everything for yourself.
To save you guys the long, boring details, I won't be able to attend makeup school like I hoped for... at least not for awhile. Although I'm truly grateful for what I have, my dream after college was to be able to do what I truly love. So for now, I'm just going to teach myself and practice, just like everyone else, and resort to watching makeup tutorials on YouTube. And in the process, I'm going to try and document it by uploading my own videos more frequently. We all have to start somewhere.
Anyway, I was reading Stephie's blog and I've seen that she entered a contest in being hosted by Physicians Formula. It's a long shot, but I told myself I have to at least try doing contests once in awhile just because it'll be good practice for me.

Click on the banner if you want to vote for me! (end shameless plug lol)
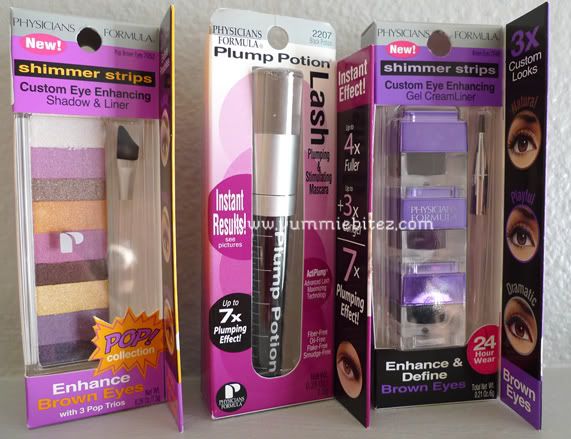
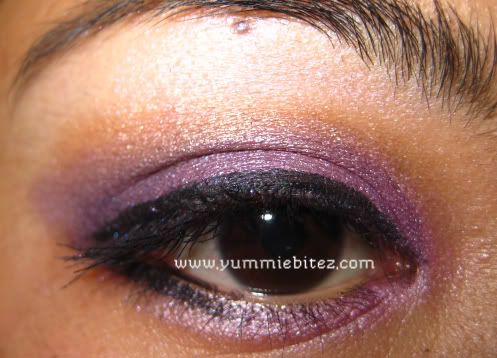
Here's a purple look that I did for the Physicians Formula contest. For my eyes, I only used Physicians Formula products (as pictured below).

**NOTE** The Physicians Formula website is taking awhile to process my video, so I'm not quite sure when it'll be up. However, I did edit a version for YouTube :).
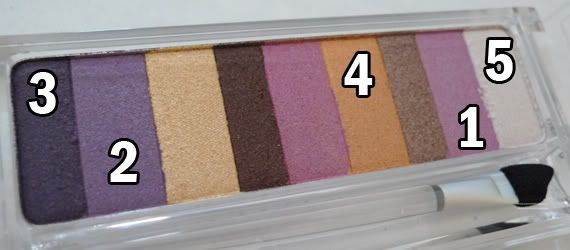
Since the palette didn't have names for the eyeshadows, I've labeled the color in the order that I used it for this video tutorial.

Face: MUFE Duo Mat Foundation in 203 using a synthetic face brush. For my cheeks, I used MAC True Romantic beauty powder blush.
Eyes: I applied the Urban Decay Primer Potion to prep my eyes and used Physicians Formula Gel Cream Liner in Purple as my base for my eyeshadow. I used the Physicians Formula Shimmer Strips Eye Palette for my eyeshadows. Using a shader brush, I applied PF [1] eyeshadow (lilac eyeshadow) on top of the base applying it all over my lids. Then, with a pencil brush, I took [2] eyeshadow (purple eyeshadow) on my outer V and bringing it up to my crease. To define my outer V area, I used [3] eyeshadow (indigo eyeshadow) with a pencil brush and then bringing up the color up to my crease. I blended the [4] eyeshadow (dark gold eyeshadow) just above my crease color to lightly blend the harsh lines. I highlighted my brow area with [5] eyeshadow (shimmery white eyeshadow) to brighten up my eye area. I lined my lash line and half of my lower lash line with Physicians Formula Gel Cream Liner in black. On the lower half of my lash line, I used PF [1] eyeshadow (lilac eyeshadow) with a shader brush. Curl lashes, and finish of your eye makeup with mascara. I used Physicians Formula Plump Potion.
Lips: Dior Cat Mauve lipstick.
For more photos of the finished look and the video tutorial, click after the jump!

Well, not the case. Your priorities actually shift. You start to realize that you actually had more time when you were in school. You have to work full-time to support yourself. It's even more of a challenge when you move out from home. Yes, you do have independence and the freedom, but it comes with a price of having to do everything for yourself.
To save you guys the long, boring details, I won't be able to attend makeup school like I hoped for... at least not for awhile. Although I'm truly grateful for what I have, my dream after college was to be able to do what I truly love. So for now, I'm just going to teach myself and practice, just like everyone else, and resort to watching makeup tutorials on YouTube. And in the process, I'm going to try and document it by uploading my own videos more frequently. We all have to start somewhere.
Anyway, I was reading Stephie's blog and I've seen that she entered a contest in being hosted by Physicians Formula. It's a long shot, but I told myself I have to at least try doing contests once in awhile just because it'll be good practice for me.
Click on the banner if you want to vote for me! (end shameless plug lol)
Here's a purple look that I did for the Physicians Formula contest. For my eyes, I only used Physicians Formula products (as pictured below).

**NOTE** The Physicians Formula website is taking awhile to process my video, so I'm not quite sure when it'll be up. However, I did edit a version for YouTube :).
Since the palette didn't have names for the eyeshadows, I've labeled the color in the order that I used it for this video tutorial.

Face: MUFE Duo Mat Foundation in 203 using a synthetic face brush. For my cheeks, I used MAC True Romantic beauty powder blush.
Eyes: I applied the Urban Decay Primer Potion to prep my eyes and used Physicians Formula Gel Cream Liner in Purple as my base for my eyeshadow. I used the Physicians Formula Shimmer Strips Eye Palette for my eyeshadows. Using a shader brush, I applied PF [1] eyeshadow (lilac eyeshadow) on top of the base applying it all over my lids. Then, with a pencil brush, I took [2] eyeshadow (purple eyeshadow) on my outer V and bringing it up to my crease. To define my outer V area, I used [3] eyeshadow (indigo eyeshadow) with a pencil brush and then bringing up the color up to my crease. I blended the [4] eyeshadow (dark gold eyeshadow) just above my crease color to lightly blend the harsh lines. I highlighted my brow area with [5] eyeshadow (shimmery white eyeshadow) to brighten up my eye area. I lined my lash line and half of my lower lash line with Physicians Formula Gel Cream Liner in black. On the lower half of my lash line, I used PF [1] eyeshadow (lilac eyeshadow) with a shader brush. Curl lashes, and finish of your eye makeup with mascara. I used Physicians Formula Plump Potion.
Lips: Dior Cat Mauve lipstick.
For more photos of the finished look and the video tutorial, click after the jump!

Friday, September 05, 2008
L'Oreal HIP Color Rich Cream Crayon (Review)
I originally saw this when I was picking up the HIP Metallic Duo eyeshadows. I decided to pick these up as well since they were BOGO at the time. They had stricken my fancy when I saw them on display next to the eyeshadows because they reminded me of the MAC shadesticks. I'm all about saving if I could, so I thought maybe this can be a good dupe. But the question is, are they as good as the good ol' MAC shadesticks??
What they say about it: Bloom into the world of color with HIP high intensity pigments Color Rich Cream Crayon Eyeshadow and Liner. Ultra-versatile color comes in six rich, super fresh shades.
Technology in bloom: a cream shadow and liner wrapped in one.
HIP high intensity pigments Color Rich Cream Crayon is a fresh take on makeup. Apply to lid as all-over base shadow. Or use it as a liner to dial up definition.
And, all like HIP high intensity pigments products, this long-wearing crayon packs more pigment in every shade. So, when it comes to breath taking looks you're sure to be a natural. (source)
Price: $9.99 (price varies depending on stores)
Available at: Major drugstores (Walgreens, Rite Aid, CVS, etc)
L'Oreal HIP Color Rich Cream Crayon
Quality: 5 out 5
Price: 5 out of 5
Packaging: 5 out 5
Overall: 5 out of 5

SWATCHES:
What I like about it: As you can tell from the swatches, these crayons are highly pigmented and with a metallic finish. It works well as a base, eyeshadow, or even as a liner.
I swatched the L'Oreal HIP crayon and my MAC Shadestick (in Beige-ing) right next to each other. I tried rubbing both of the swatches and the L'Oreal HIP crayon definitely did not budge nor faded while as the shadestick smeared and disappeared after a few rubs. You will definitely need a good eye makeup remover to get the HIP crayon out!
When it comes to applying it as a base on my eyelids, the L'Oreal HIP crayon is softer and easier on the eyes. It wasn't a constant battle trying to use the crayon when applying it into my eyelids as it glides on easily as oppose to the MAC shadestick where I sometime find myself tugging on my lids (big no-no!) just to get the product to apply evenly. The base is actually really good also in terms of making your eyeshadow vibrant. I paired up the green crayon with my MAC Fresh Mix MES, and the colors just popped. I've also used the pink crayon in my previous Laura Mercier tutorial and it definitely gave me a better color pay-off as oppose to not using it as a base. The eyeshadow were also still blendable when using the HIP crayon.
Another good thing about this product is it comes with a sharpener that you can pull out at the bottom. It's actually rather convenient and a big plus if you want to use the crayon as an eyeliner. A pointier end will definitely give you a better line. I've used the crayon as an eyeliner, and it only showed minimal fading during a really hot weather (think high 90's) here in sunny California.


You'll definitely get more bang out of you buck if you purchase these when they go on sale. I'm not too sure if I'll purchase these at $10 each, but I'm all over it if they're in BOGO or even BOGHO (50% off second item). Why not get it cheaper if you can?
What I don't like about it: I guess the retail price. It's almost as much as a MAC shadestick for a drugstore brand. But then again, the quality of the HIP crayon is much better in my opinion so I can see some justification on the pricing there. I also don't like how they only have six shades available meaning the color selection is very limited. Sometimes they're also hard to find or unavailable in certain drugstores. You only have your basic colors, but it will be a really nice addition to have a creme color available.
Will I buy this again: Absolutely! Especially if more colors become available. I think the HIP crayon is a good alternative to MAC shadesticks, and like I mentioned earlier, it's probably even better. For a drugstore brand, L'Oreal is definitely stepping up it's game in giving a better quality at a relatively lower price.
Technology in bloom: a cream shadow and liner wrapped in one.
HIP high intensity pigments Color Rich Cream Crayon is a fresh take on makeup. Apply to lid as all-over base shadow. Or use it as a liner to dial up definition.
And, all like HIP high intensity pigments products, this long-wearing crayon packs more pigment in every shade. So, when it comes to breath taking looks you're sure to be a natural. (source)
Price: $9.99 (price varies depending on stores)
Available at: Major drugstores (Walgreens, Rite Aid, CVS, etc)
Quality: 5 out 5
Price: 5 out of 5
Packaging: 5 out 5
Overall: 5 out of 5
SWATCHES:
What I like about it: As you can tell from the swatches, these crayons are highly pigmented and with a metallic finish. It works well as a base, eyeshadow, or even as a liner.
I swatched the L'Oreal HIP crayon and my MAC Shadestick (in Beige-ing) right next to each other. I tried rubbing both of the swatches and the L'Oreal HIP crayon definitely did not budge nor faded while as the shadestick smeared and disappeared after a few rubs. You will definitely need a good eye makeup remover to get the HIP crayon out!
When it comes to applying it as a base on my eyelids, the L'Oreal HIP crayon is softer and easier on the eyes. It wasn't a constant battle trying to use the crayon when applying it into my eyelids as it glides on easily as oppose to the MAC shadestick where I sometime find myself tugging on my lids (big no-no!) just to get the product to apply evenly. The base is actually really good also in terms of making your eyeshadow vibrant. I paired up the green crayon with my MAC Fresh Mix MES, and the colors just popped. I've also used the pink crayon in my previous Laura Mercier tutorial and it definitely gave me a better color pay-off as oppose to not using it as a base. The eyeshadow were also still blendable when using the HIP crayon.
Another good thing about this product is it comes with a sharpener that you can pull out at the bottom. It's actually rather convenient and a big plus if you want to use the crayon as an eyeliner. A pointier end will definitely give you a better line. I've used the crayon as an eyeliner, and it only showed minimal fading during a really hot weather (think high 90's) here in sunny California.
You'll definitely get more bang out of you buck if you purchase these when they go on sale. I'm not too sure if I'll purchase these at $10 each, but I'm all over it if they're in BOGO or even BOGHO (50% off second item). Why not get it cheaper if you can?
What I don't like about it: I guess the retail price. It's almost as much as a MAC shadestick for a drugstore brand. But then again, the quality of the HIP crayon is much better in my opinion so I can see some justification on the pricing there. I also don't like how they only have six shades available meaning the color selection is very limited. Sometimes they're also hard to find or unavailable in certain drugstores. You only have your basic colors, but it will be a really nice addition to have a creme color available.
Will I buy this again: Absolutely! Especially if more colors become available. I think the HIP crayon is a good alternative to MAC shadesticks, and like I mentioned earlier, it's probably even better. For a drugstore brand, L'Oreal is definitely stepping up it's game in giving a better quality at a relatively lower price.
Tuesday, June 24, 2008
Depotting your NYX Eyeshadow Trio (How To)
As we all know that any NYX Eyeshadow Trio fits perfectly in the MAC palette. So here is my method of depotting my NYX Trio. It's pretty simple, and it's almost similar to how you depot your MAC eyeshadow but I thought to just put it out there anyway.
I like depotting my NYX eyeshadow and house them along with my MAC eyeshadows in the MAC palette since it saves more space in storage, and it save you the time of shuffling around for eyeshadows since they're all in one place.
Items you will need:
*Click on the image to enlarge

NYX Eyeshadow Trio
Paring Knife (make sure the metal part is thin but sturdy enough)
Round Adhesive Magnets (my magnets were pre-cut using a round scrapbooking hole puncher)
1 inch Round Labels (available at your nearest office supply stores)
Straightening Iron
Wax Paper (the gift wrap paper that clothing stores give you)
Procedure:

I like depotting my NYX eyeshadow and house them along with my MAC eyeshadows in the MAC palette since it saves more space in storage, and it save you the time of shuffling around for eyeshadows since they're all in one place.
Items you will need:
*Click on the image to enlarge
Procedure:
- Take your paring knife and pop the plastic casing where the eyeshadow pans sit. You'll need a knife that'll fit in the skinny space on the outer edge of the plastic casing. Poping it should be pretty simple and requires minimal force. It should pop right off.
- After popping the plastic off, place it on top of your straightening iron plate with a piece of wax paper underneath. This will prevent the plastic from melting right off your straightening iron. Let it sit for a about 3-5 minutes depending on your heat settings. You'll notice that the eyeshadow pan will rise up as the plastic heats.
- When the plastic has melted, it should be really easy to get the eyeshadow pan out of the plastic casing. If you have to force the eyeshadow out, place it back into your straightening iron and let the plastic melt some more. Since the metal pans are softer than the MAC eyeshadow ones, applying force will distort the NYX pan's shape and can break the eyeshadow. THE EYESHADOW PANS AND THE PLASTIC WILL BE HOT! So be careful when you do take them out, and try not to touch it. The pans still has some glue in it, it'll just be painful having a hot pan stuck in your finger or hand.
- Also, keep in mind to line up your eyeshadow in the order they were. I made this mistake in the beginning and I had to retrace back which eyeshadow matches the color at the bottom of the trio. It'll just be much simpler when you label your eyeshadows but in case you still forget, you can go to cherryculture.com and try matching and lining up the colors based on the images on the website.
- Unlike the MAC eyeshadows, there's not much glue at the back of the NYX eyeshadow pan. This is why it's easier to get it out of the plastic casing. I didn't really need to clean the back with alcohol especially since a label will just go on top of it.
- Place your adhesive round magnets facing the sticky side at the back of the pan.
- Put your round label sticker on top of the magnet to label your eyeshadow. Or if you prefer, you can stick it on the inside cover of the palette like some people do for better visibility of the color names. However you want to label it is up to you.
- Now your eyeshadow is ready to be placed in your MAC palette.
Subscribe to:
Posts (Atom)
©
beautybitten | a personal style & beauty blog | All rights reserved.